The MYD-AM335X board has six serial ports. But UART4 and UART5 have been reused with other functions. If sometimes you need to use all the six serial ports, we can modify the kernel.
-
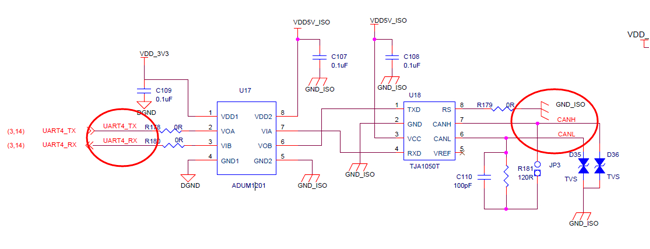
The UART4 is reused with CAN, we use CAN by default
-
The UART5 is reused with K2/K3 button, we use K2/K3 button by default.
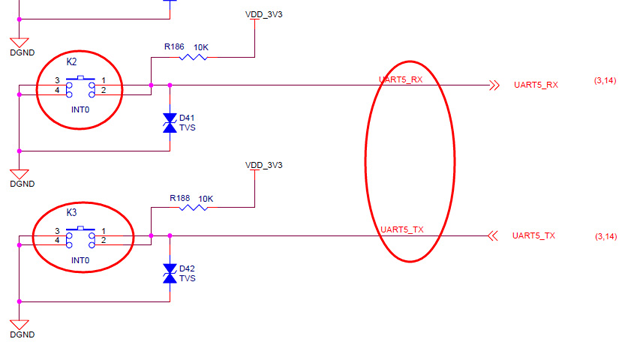
Note: So if you want to use UART4 and UART5, you can not use the CAN and K2/K3 button then.
Please make modifications about kernel as below:
1. Open the kernel file
$vi arch/arm/mach-omap2/board-am335xevm.c
2. Add UART4 and UART5 function definition codes if not exist.
/* Module pin mux for uart3 */
static struct pinmux_config uart3_pin_mux[] = {
{"spi0_cs1.uart3_rxd", OMAP_MUX_MODE1 | AM33XX_PIN_INPUT_PULLUP},
{"ecap0_in_pwm0_out.uart3_txd", OMAP_MUX_MODE1 | AM33XX_PULL_ENBL},
{NULL, 0},
};
/* Module pin mux for uart4 */
static struct pinmux_config uart4_pin_mux[] = {
{"uart0_ctsn.uart4_rxd", OMAP_MUX_MODE1 | AM33XX_PIN_INPUT_PULLUP},
{"uart0_rtsn.uart4_txd", OMAP_MUX_MODE1 | AM33XX_PULL_ENBL},
{NULL, 0},
};
/* Module pin mux for uart5 */
static struct pinmux_config uart5_pin_mux[] = {
{"mii1_col.uart5_rxd", OMAP_MUX_MODE3 | AM33XX_PIN_INPUT_PULLUP},
{"rmii1_refclk.uart5_txd", OMAP_MUX_MODE3 | AM33XX_PULL_ENBL},
{NULL, 0},
3. Add UART initialization code if not exist, as below in blue words.
static void uart3_init(int evm_id, int profile)
{
printk("--------uart3_init\n");
/* Configure Uart3*/
setup_pin_mux(uart3_pin_mux);
return;
}
static void uart4_init(int evm_id, int profile)
{
printk("--------uart4_init\n");
/* Configure Uart4*/
setup_pin_mux(uart4_pin_mux);
return;
}
static void uart5_init(int evm_id, int profile)
{
printk("--------uart5_init\n");
/* Configure Uart4*/
setup_pin_mux(uart5_pin_mux);
return;
}
4. Add registration for the UART4 and UART5 and comment out the CAN and keys functions as in below red codes.
{uart1_init, DEV_ON_BASEBOARD, PROFILE_ALL},
{uart2_init, DEV_ON_BASEBOARD, PROFILE_ALL},
{uart3_init, DEV_ON_BASEBOARD, PROFILE_ALL},
{uart4_init, DEV_ON_BASEBOARD, PROFILE_ALL},
{uart5_init, DEV_ON_BASEBOARD, PROFILE_ALL},
// {d_can_init, DEV_ON_BASEBOARD, PROFILE_ALL},
// {gpio_keys_init, DEV_ON_BASEBOARD, PROFILE_ALL},
{gpio_led_init, DEV_ON_BASEBOARD, PROFILE_ALL},
{NULL, 0, 0},
5. Re-compile the kernel and update the system.
|


